How To Design A Front Yard Foundation Planting
Figuring out what to plant in front of the house can be very intimidating for new gardeners. I want to make it easy. So, in this post, I’ll simplify the fundamentals of foundation planting. Plus I’ll give you tons of tips for choosing the best plants for the front of your house. Then I’ll walk you through the process of creating my own front yard foundation garden plan, and planting everything, step-by-step.
This is a paid endorsement. The author has been compensated and provided with the product free of charge in return for their honest opinion.
Foundation landscape design is typically more stressful than it is for other gardens because your front garden is main focal point that people see when walking up to your house. You want to make sure the style and plantings match the style and color of your house, enhancing the house, not hiding it or making it look bad. So, before getting started, it’s important to understand a few foundation planting basics…
Foundation Planting Basics
I want to make this super easy for you, so I will break it all down starting with the basics. Before you go ripping out those old scraggly shrubs or shopping for plants, take some time to do some planning. Not only will this help ensure a lovely foundation planting, it will make it much easier to choose the plants.
Determine the sun exposure – Be sure to measure the sun exposure of the area before you start planning. If you’re like me, you may find that you have two different sun exposures to deal with. The plants directly in front of my house are in partial shade, but the ones on the end are in full sun. Learn how to determine the sun exposure of a garden area.
Measure the area – When landscaping under front windows, you’ll want to measure how high the windows are. That way you can be sure you get shrubs and plants that are the proper height, and won’t end up covering the windows once they’re mature. Also be sure to measure the depth and width of the area so you can get an idea of how many plants you’ll need to fill it, but not overcrowd it.
Look at the style of your house – As you brainstorm landscape design ideas, first think about the style of your house. You may find it easier to do some research to get inspiration for the specific style of your house. Take some photos of the front of your house and bring them to the garden center with you. They will be able to suggest plants that will work with the style of your house.
Think about plant spacing – Proper spacing is one of the most difficult things about designing a foundation planting. It’s hard to think about waiting a few years before everything fills in. But resist the urge to crowd the plants, especially shrubs. Planting too close together will create a messy, overgrown feeling once everything fills in. You can always fill in the empty spaces with annuals and containers until the perennials and shrubs fills in.
Draw out your design on paper – If you’re having a hard time visualizing everything, then it might help to draw it out first. You can use a photo of the front of your house to draw on, or you can just sketch it out to get an idea. Even if it’s not perfect or drawn to scale, sketching your ideas on paper can help to get the creative juices flowing.
Tips For Choosing Foundation Plants And Shrubs
Choosing plants is fun, but it can also be stressful – especially for foundation planting! So below I’ll share some tips for how to choose the best plants and shrubs for the front of your house.
How To Choose Shrubs For The Front Of Your House
Size – The most important thing to consider when choosing foundation shrubs is the size of the mature plant. You don’t want to end up with huge shrubs that will cover the windows and look overgrown, or constantly need to be trimmed. Also, be careful when choosing trees and large shrubs to plant close to house foundations. Too often I see people plant a tree or large shrub right next their foundation, not thinking about the full size of the plant. Once they mature, large shrubs and trees can cause major headaches – and possibly even damage to the foundation, siding or roof of your house.
Color – Another important thing to think about when choosing shrubs is the color. I chose shrubs that compliment the color of the brick on my house, and creates a nice contrast to the light colored siding. The dark foliage also makes a lovely backdrop for the bright and colorful perennials and flowers that I picked out.
Shape – You may also want to consider the shape of the shrubs that you choose for your foundation planting. Look at the dominate shapes of your house, and see if you can incorporate shrubs that will compliment or mimic those shapes. Don’t overdo it though.
How To Choose Plants For The Front Of Your House
Layers – When choosing landscaping plants for the front of your house, think about creating layers. The tallest should be planted in the back, then each row of plants should tier down so the shortest ones are in the front. Don’t go by the size of the plants at the garden center though, read the plant tags and plan your layers based on that.
Color – One of the biggest mistakes I see with foundation planting designs is that they’re filled with ugly or boring plain green plants. Using evergreen shrubs in your design is fine, but be sure to mix in lots of contrast and color to add visual interest and make your house pop. If you’re struggling with which colors to choose, look at your house for inspiration. If you have a red door, add a few pops of red plants in the design. If you have brick on your house, then choose plants and flowers that will accent the colors in the brick. Be sure to read the plant tag for bloom times so that you can choose a variety of flowering plants for constant color.
Unity – Don’t just look at the front of your house, take a step back and look at your entire front yard before you start planning your design. See if you can incorporate the style and plants from other garden areas into the foundation planting to create unity throughout the landscape.
Before pictures of flower beds around house foundation
My Foundation Planting Design Step-By-Step
To give you an example, and help get your creative juices flowing, I will walk you through the process of redesigning my foundation planting in the front of my house step by step.
Before you start, be sure to have the area marked by the utility companies. This is especially important to do before landscaping around foundations. I’ve lived in this house for 16 years, and I never knew this pipe was here before! Think of what could have happened if I would have hit that with my cultivator. Yikes!
Pipe hidden under soil near house foundation
Step 1: Remove the old plants – Don’t feel bad about removing the old plants! Of course, you can leave the ones you know you want to keep (I left a few in mine). But, you may find that it’s easier to start with a clean slate. Put the plants you want to keep into pots and incorporate them into your new foundation garden design, or relocate them to a different garden area.
Ripping out old landscaping around house foundation
Step 2: Amend and loosen up the soil – Foundation soil is usually very poor quality because the builders use cheap filler that is full of rocks and dirt. So, you will definitely want to amend the soil before planting anything. If you’ve never done it before, I recommend testing your soil first. That way, you will know exactly how to amend it. Determining the pH of your soil will also help you choose the right plants.
Step 3: Cultivate the soil – Not only is foundation soil poor quality, it’s also been compacted by all the heavy house-building equipment. Cultivating the soil will not only mix in the nutrients you added in step 2, it will also help to break up the compacted soil so that it’s easier for the plants to become established. The soil next to my house foundation was so hard that it was difficult to even dig a hole. The Troy-Bilt 4-Cycle Garden Cultivator was super easy to use, and quickly broke up the hard, compacted soil.
Once you’re done cultivating the soil, rake it so it’s even and leveled out again. Just be sure to keep the grading so that the soil goes down at an angle away from the foundation. Grading the soil is important so that the water runs away from the foundation, avoiding any water issues.
Preparing foundation soil for planting
Step 4: Choose the focal plants first – Think of your focal plants, or anchor plants, as the backdrop to your landscaping. Most people choose to use shrubs, but you could also use large perennials or even climbing plants as your focal plants. Whatever you choose to use, just be sure it’s proportionate to the space. You want your anchor plants to fill the space, but not overwhelm it in a few years.
I knew I would be planting three focal shrubs under the high windows to break up the plain siding. But I didn’t want to cover the beautiful brick, or put anything in front of the low windows on the right. In addition, I had a large corner to fill, so I wanted to be sure to choose a large focal plant for that corner too.
Choosing bushes to plant in front of the house
Step 5: Choose the rest of the plants – Now that you know the color and size of your focal plants, it’s time to add the rest of the layers. When designing a foundation planting, it’s important to layer the heights of the plants. You want the tallest ones (your anchor plants) in back next to the house, and then layer each row down so that the shortest plants are in the front.
One of the main goals for my foundation planting was to add lots of color to the front of my house. So I chose plants with colorful foliage and also a range of flowering times. I wanted to be sure that there’s always something blooming, spring through fall. Keep in mind that I also had two areas to work with, the corner is full sun, and the front of the house is partial shade.
Perennial plants for the front of my house
Step 6: Lay out your design before planting – This step is super important, so don’t skip it or you may end up having a lot of rework in your future. I actually returned a few plants after I laid everything out because I realized I wouldn’t have enough space for everything. So before you start digging, take all of the plants and place them where you want to plant them. Leave them in their pots so that you can easily move things around.
Take the time to measure the correct amount of spacing from the house and also between all of the plants so that it’s not overcrowded once everything fills in. It may look sparse now, but squint your eyes and try to imagine what it will look like when everything is full grown. Once you have everything placed, walk away. Leave it for a few days or even the whole week before you plant anything. If you haven’t moved anything by the end of the week, you know it’s right.
Laying out my foundation flower bed design
Step 7: Plant everything – Now, finally you can plant everything. Like I mentioned above, foundation soil is usually very compacted. So be sure to dig a hole that’s twice the size of the rootball of the plant, and add some water to it before planting. Loosening up the soil like this will make it easier for the roots to become established. It’s a good idea to leave the top of the rootball slightly above the soil line, so that the plant won’t sink too deep once the dirt settles. Learn more about how to transplant garden plants.
Me planting bushes next to the house
Step 8: Add mulch – Once you have everything planted, all that’s left to do is add mulch. I recommend using a natural hardwood mulch for foundation planting rather than rock. Wood mulch helps to retain soil moisture, keep the roots cool, protect the plants during the winter, and it also feeds the soil as it breaks down. Rock on the other hand can get very hot in the sun, and burn plants. Rock is also a pain to work with if you need to dig up or replant anything. Choose mulch that will compliment the color of your house, and also accent the plants.
Done planting flower beds in front of the house
I’m thrilled with the results of my new foundation planting. Before it looked scraggly and tired, and it was in desperate need of a major change. Now the curb appeal is so much nicer, and I love walking by it. It may look a little sparse now, but once everything fill in, it’s going to look amazing!
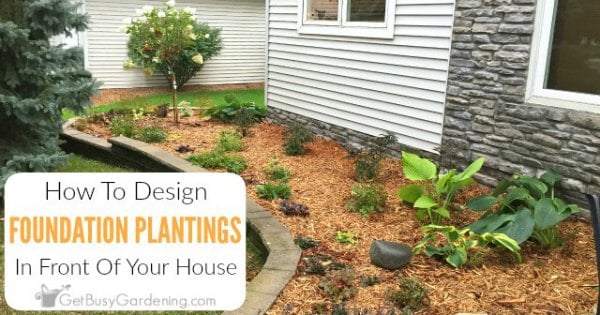
After pictures of my new foundation flower beds
The Troy-Bilt 4-Cycle Garden Cultivator
The 4-Cycle Garden Cultivator is small enough to use next to the house foundation, and powerful enough for breaking up even the most compacted soil. It’s very easy to control, and I didn’t need any help tilling the entire garden bed myself. It’s also nice because you don’t need to mix oil and gas, the 4-cycle engine takes regular gasoline. The Troy-Bilt 4-Cycle Garden Cultivator is going to work great for tilling my vegetable garden beds this fall too, I can’t wait! Learn more about it here.
There are lots of things to consider when designing the foundation planting in front of your house. But if you take your time and follow these steps, you will end up with front flower beds that will complement the color and style of your house, and add tons of curb appeal that you will love.
Related Garden Design Posts
Share your foundation planting ideas or design tips in the comments section below.